Ray Wilson authored this content while he was actively running MFOS as the founder and resident genius.
We retain the content because it reflects a valuable point of view representing that time and place.
Article by Ray Wilson
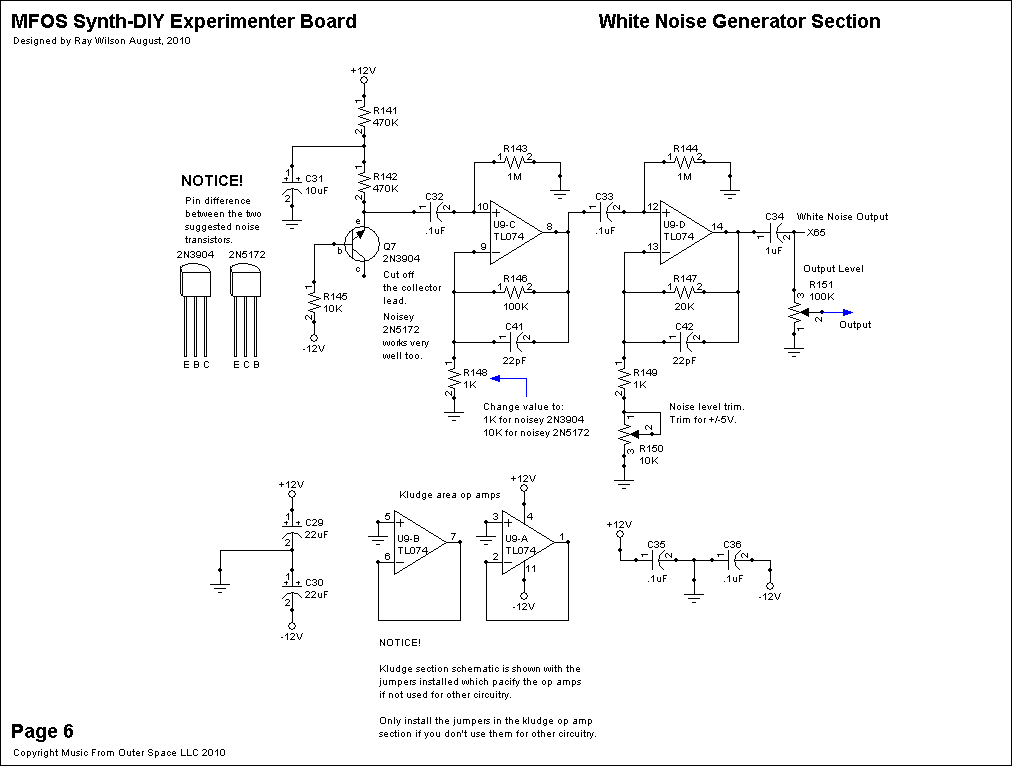
White Noise Generator Schematic (Page 6) PDF
White noise ideally contains an equal distribution of all audio frequencies (WIKIPEDIA White Noise) and sounds similar to when you say "shhhhhh" through your teeth. It is used to make rain sounds, surf sounds, wind sounds, gongs and cymbals, and of course the "shhhhhh" sound if you like. You can also use noise as an unusual modulation source.
The most common way to make true white noise is to exceed the emitter base junction voltage of a transistor and listen to all those cascading electrons crashing into one another. R141 and R142 470K resistors are connected in series to +V and the other end is connected to the emitter of the "noise" transistor. This is not a special transistor just one that exhibits good noise when connected in this manner. The base of the transistor is connected via R145 10K resistor to -V. You can connect the base directly to -V but I found that by inserting some resistance the noise is more symmetrical (top to bottom). This biasing insures that we are well beyond the reverse breakdown voltage of the specified transistor's emitter base junction.
We pick off the noise signal at the emitter of Q7 and capacitively couple it to the non-inverting input of U9-C whose gain is fixed at 101 by 100K feedback resistor R146 and 1K gain set resistor R148. C41 stabilizes op amp U9-C and prevents unwanted oscillation. R143 biases the high impedance non-inverting input (U9-C pin 10) to ground so that it doesn't float around. If you have an exceptionally noisy transistor use a 10K for R148 to reduce the gain of this stage to 11. The output of the first gain stage is capacitively coupled to the non-inverting input of U9-D whose gain is adjustable from about 2.8 to about 21. R147 is U9-D's 20K feedback resistor and 1K resistor R149 in series with 10K trimmer R150 form the gain set resistor. R144 biases the high impedance non-inverting input (U9-D pin 12) to ground so that it doesn't float around. C42 stabilizes op amp U9-D and prevents unwanted oscillation. Trim pot R150 is used to set the noise output level. While observing point X65 with your scope adjust R150 until you see about +/-5 volts on the output of U9-D at point X65.
As I show in the schematic a 2N3904 will work fine (just about every one I tested from my drawer worked fine as far as noise level) and the 2N5172 works even better if you can get hold of a few you will find one that is literally 10 times noisier than the 2N3904 (which is why I suggest changing the gain of U9-C). Cut off the emitter after you find the noise transistor. Don't lame your whole drawer of trannies just the noisiest one.
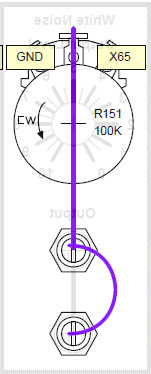
The output X65 is dropped on panel mounted Noise Level pot R151 whose wiper is connected to the noise output jacks. R151 permits adjustment of the level of noise from none to full +/-5V.
KLUDGE AREA
Don't forget the kludge area! There are two op amps just begging for your special touch. They can be configured as mixers, buffer amps, etc. Remember that if you do not use them I suggest that you solder the jumpers shown on the board. If you do use them DON'T solder the jumpers in because they will interfere with your circuit. I show some ideas for use on the "Ideas..." tab.
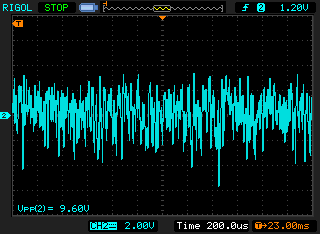
AREG Scope Photos
| White Noise (Max Output) |
|
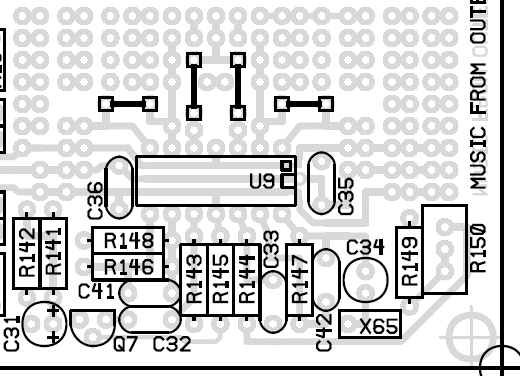
White Noise Generator PCB Parts Layout (Parts Side Shown)
I find this one useful for trouble shooting since the designators on the PC board are covered by the installed components.
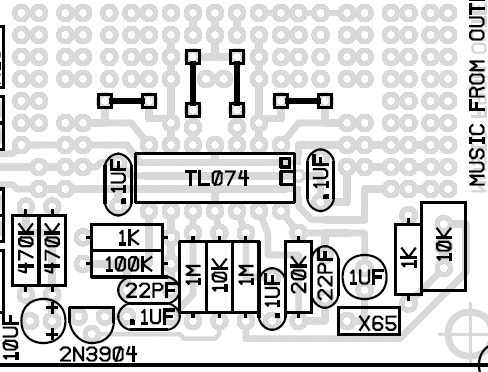
White Noise Generator PCB Part Value View (Parts Side Shown)
I find this one useful for populating the PC board since I don't have to continually refer back to the schematic to know the value for a designator.
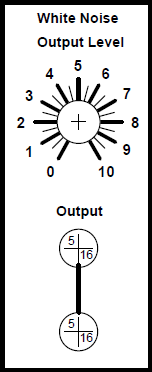
White Noise Generator Front Panel Template
These front panel layouts are suggestions and are meant to illustrate the circuit's user interface and wiring between the panel and the PC board. I'm certain you can come up with a much cooler looking panel but this utilitarian version will certainly work to get you started.
White Noise Generator Front Panel Wiring
White Noise Generator Project Parts List
Resistor Color Chart For Resistors Used In This Circuit
The resistors should be carbon composition or carbon film.Use 1/4 watt resistors because 1/2 watt will be too big for the board.
| Qty. | Description | Value | Designators |
|---|---|---|---|
| 1 | TL074 Quad Op Amp | TL074 | U9 |
| 1 | 2N3904 General Purpose NPN Transistor | 2N3904 | Q7 |
| 1 | Resistor 1/4 Watt 5% | 100K | R146 |
| 1 | Resistor 1/4 Watt 5% | 10K | R145 |
| 2 | Resistor 1/4 Watt 5% | 1K | R148, R149 |
| 2 | Resistor 1/4 Watt 5% | 1M | R143, R144 |
| 1 | Resistor 1/4 Watt 5% | 20K | R147 |
| 2 | Resistor 1/4 Watt 5% | 470K | R141, R142 |
| 12 | Potentiometer Linear Taper | 100K | R151 |
| 1 | Single Turn Trim Pot | 10K | R150 |
| 1 | Alum. Electrolytic Capacitor | 10uF | C31 |
| 2 | Alum. Electrolytic Capacitor | 22uF | C29, C30 |
| 1 | Capacitor Alum. Nonpolarized (small w/radial leads) | 1uF | C34 |
| 4 | Capacitor Ceramic | .1uF | C32, C33, C35, C36 |
| 2 | Capacitor Ceramic | 22pF | C41, C42 |
Miscellaneous
- 1/16" thick aluminum plate for mounting the pots and switches.
- Assorted hardware 1" 6-32 nuts and bolts, 1/2" #8 wood screws, etc
- Knobs for potentiometers, wire, solder and typical assorted electronics hand tools.
- Digital volt meter and a signal tracer or oscilloscope for testing.