Ray Wilson authored this content while he was actively running MFOS as the founder and resident genius.
We retain the content because it reflects a valuable point of view representing that time and place.
Article by Ray Wilson
SONIC MULTIPLIER Features
SONIC MULTIPLIER Quirks
The SONIC MULTIPLIER MP3s
Beginning of Time (Internal sine x guitar)
Guitar X Vocal
Internal Osc At Freq Steps X Voice
Internal Osc Modded X Voice
Internal Osc X Guitar
Internal Osc X Sine Sweep
Internal Osc X Square Sweep
Internal Osc X Synth Piano
Internal Osc X Synth Strings
Internal Sine Oscillator
Vocal Squared
Voice X Glock
Voice X Synth Breathy Vox
|
|
Introduction
The SONIC MULTIPLIER is a great addition to any modular synth project. By multiplying signals the sounds of bells can be emulated. Put your voice through the SONIC MULTIPLIER to sound like a complete alien and get odd effects by playing other instruments through it. I have noticed that when the internal sine is tuned for example to a "D" and then I gently pick the notes of D Maj on the guitar that even the modulated tones sound good together. There is a wide field of experimental music open trying things of that nature.
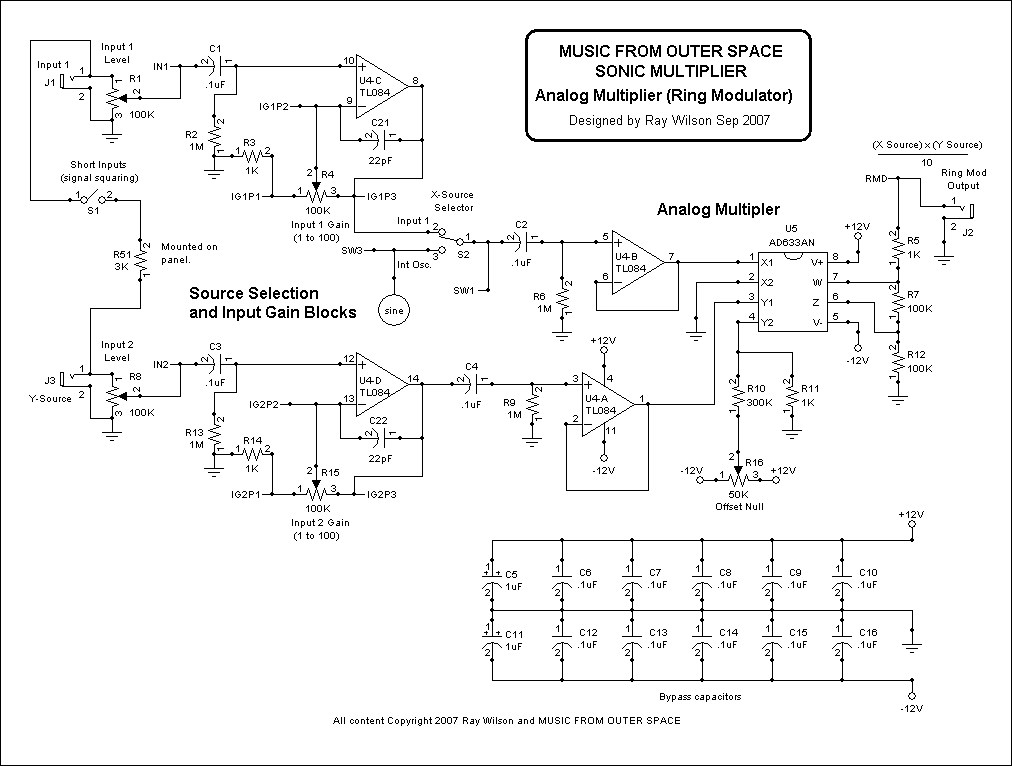
SONIC MULTIPLIER Schematic Page 1 PDF
|
Schematic page 1 shows the input conditioners and the analog multipler. Each input has a pot used for a variable voltage
divider (level pots) feeding the non-inverting input of an op-amp via a .1uF cap an dropped across a 1M resistor. Each op-amp
has a 100K pot in it's feedback loop which is configured to change the gain from 1 (gain pot completely counter-clockwise) to 100
(gain pot completely clockwise). This provides adequate gain for microphones and guitars while also permitting line or synth level
signals to be used by turning the gain down to one and using the level pot to set the input level.
The 22pF caps in the feedback loops of U4-C and U4-D prevent oscillation when the gain is higher than 1 and are effectively shunted when the gain pot is set to a gain of 1 (pot fully counter-clockwise). The gain stages (U4-C and associated components) and (U4-D and associated components) are followed by op-amps U4-B and U4-A used as buffers. They provide a low impedance high drive source for the AD633N analog multiplier chip which is the heart of the SONIC MULTIPLIER. Although the AD633 data sheet says it can be driven by high impedance sources I noticed that when I tried to do so the behavior was not what I expected. With the arrangement shown it works perfectly. As the AD633N Analog Multiplier's name implies it takes the analog signal at the X differential inputs and multiplies it by the analog signal at the Y differential inputs and then by 1/10V. This is so signals in the range of 10 volts can be multiplied together and not exceed the maximum voltage that chip can output (ie 10V x 10V x 1/10V = 10V). We are using the input amplifiers of the AD633N in single ended mode by grounding X2 and effectively grounding Y2 through R11 (1K resistor). We set the output of U5 to have a gain of 2 using the Z input to the chip (and R7 and R12). Since we are expecting 10V peak to peak signals (+5V to -5V) for inputs we add the gain. Because we only ever have at most 5V x 5V at the inputs to the multiplier we would end up with 2.5V peaks at the output of U5 (5 x 5 x 1/10). The gain of two at the output of U5 insures that it outputs 10V P-P (+5V to -5V) just like the input signals being multiplied. It is important to null the Y input by using the Offset Null trimmer. When there is no input to the Y side of the multipler you want as close to complete silence as possible at the output of the AD633N. Anything multiplied by zero is zero so by nulling the offset of the Y input you make sure that the signal at the X input has nothing to be multiplied by unless there is a signal coming in through Input 2. To adjust Offset Null (50K trimpot R16) turn all pots to zero, set S1 to open (Not Connect In1 to In2) and S2 to Internal Sine Oscillator. Turn the sine oscillator coarse frequency to about the 1:00 o-clock position and then monitor the output of the SONIC MULTIPLIER (at J2) with either a scope set to 20 mV per division or your ears (with an amplifier). You will hear the sine oscillator but by adjusting R16 you will find the point at which the oscillation is as low as possible. Leave the trimmer there and you're done. The dynamic difference between the output when signals are being multiplied and the sine bleed-thru will be pretty great and in most cases not a problem. If it is a problem use a noise gate to stop all traces of sound from coming through until they are beyond the threshold you desire. You can select the multiplied sources to be:
When using squaring mode it is advised to connect one or the other inputs but not both. However the inputs are still isolated from one another by 3K in the event you forget and nothing bad will happen (to the SONIC MULTIPLIER or the connected signals). The inputs are capacitively coupled but very little loss of low frequency content will occur because .1uF into a 1M load is not much of a high pass filter. Low frequency input signals will be slightly differentiated (most noticeable with square wave inputs). The output is DC coupled from the AD633N but again since the inputs are AC coupled signals with DC offset will not propogate the DC to the output.
|
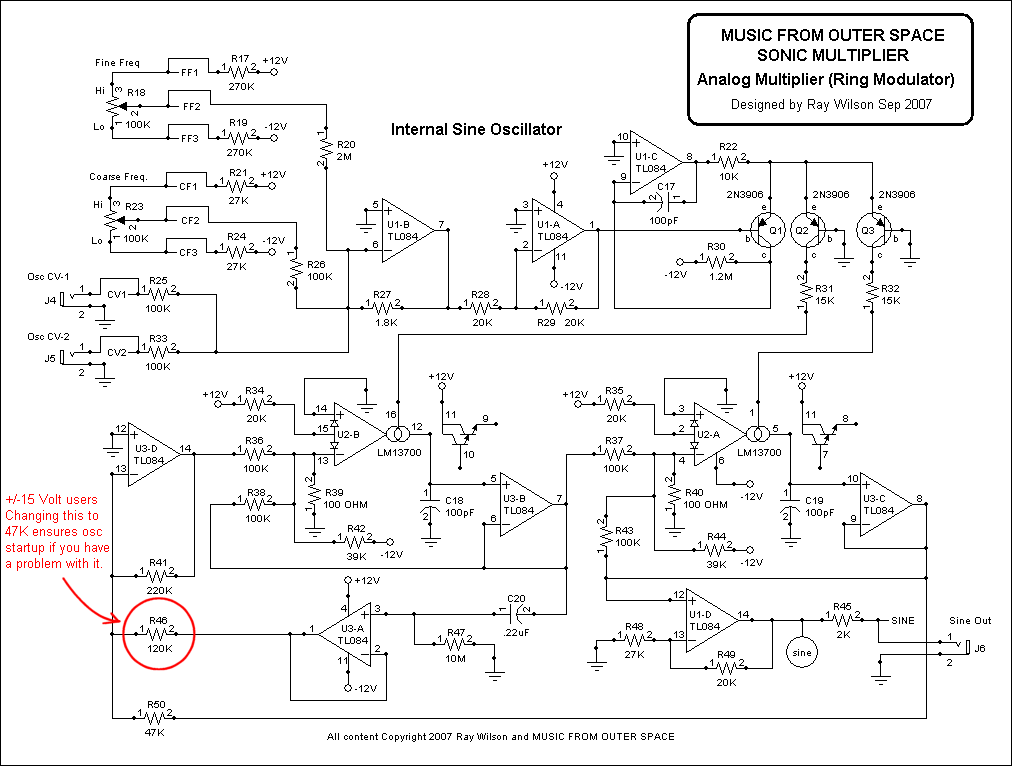
SONIC MULTIPLIER Schematic Page 2 PDF
|
Note that if you are using +/-15V and having an issue with oscillator startup replace R46 with a 47K resistor. DIY-er Scott Deyo wrote to
alert me that there was an issue. Thanks very much Scott.
Page two shows the voltage controlled sine wave oscillator used as the SONIC MULTIPLIER's selectable multiplier signal. Sine waves make great signals to multiply other signals by for some really nice bell tones. The sine oscillator in the SONIC MULTIPLIER is a two integrator and inverter with a little extra positive feedback (via U3-A) to insure the oscillator starts and is stable in amplitude throughout it's range. If you look close you will see that this is the state variable filter made to oscillate permanently (and with no need for the high-pass of band-pass outputs). U3-D is the inverter/feedback summer, U2-B & U3-B (and associated components) form one integrator and U2-A & U3-C (and associated components) form the other integrator. Someone with more electronics engineering knowledge than me would have to explain the theory behind this oscillator. I just started with the State Variable filter in oscillation and kept tweaking values until I got the low distortion and stability I was looking for. The PNP based expo, although not a copy of his work, is definitely inspired by Bernie Hutchins. This oscillator tracks pretty well and the SONIC MULTIPLIER provides the sine output as a bonus. There are two external CV inputs to control the oscillator. Plus and Minus 15V Power Supply Changes The only change I recommend for +/-15V power supply users is to change the value of R50 from 47K to 33K so that the sine output remains at approximately +/-5V P-P. |
| Approx. Current Consumption | |
| +12V | 29mA |
| -12V | 29mA |
| +15V | 30mA |
| -15V | 30mA |
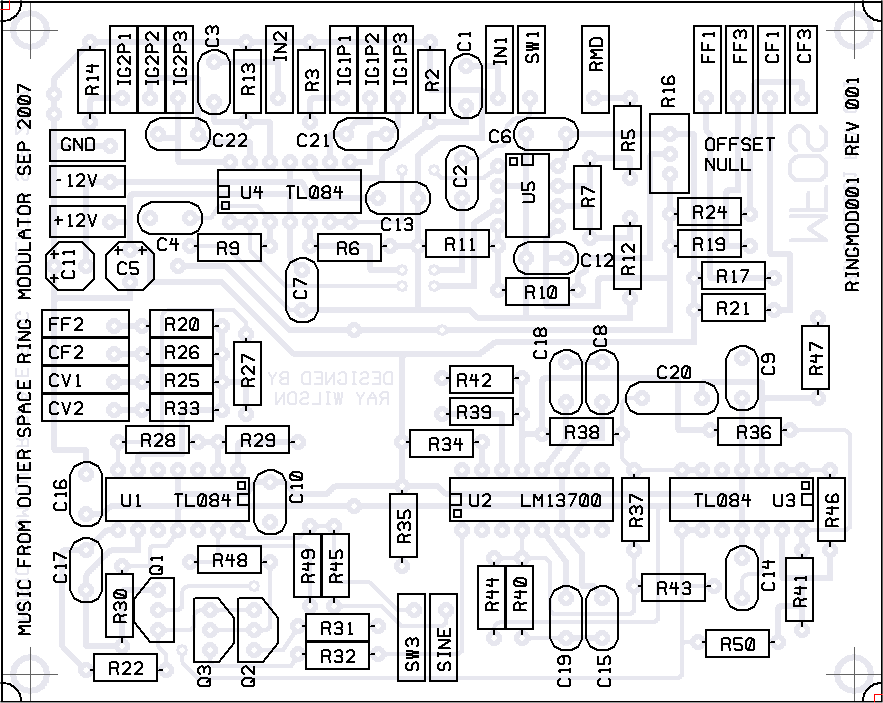
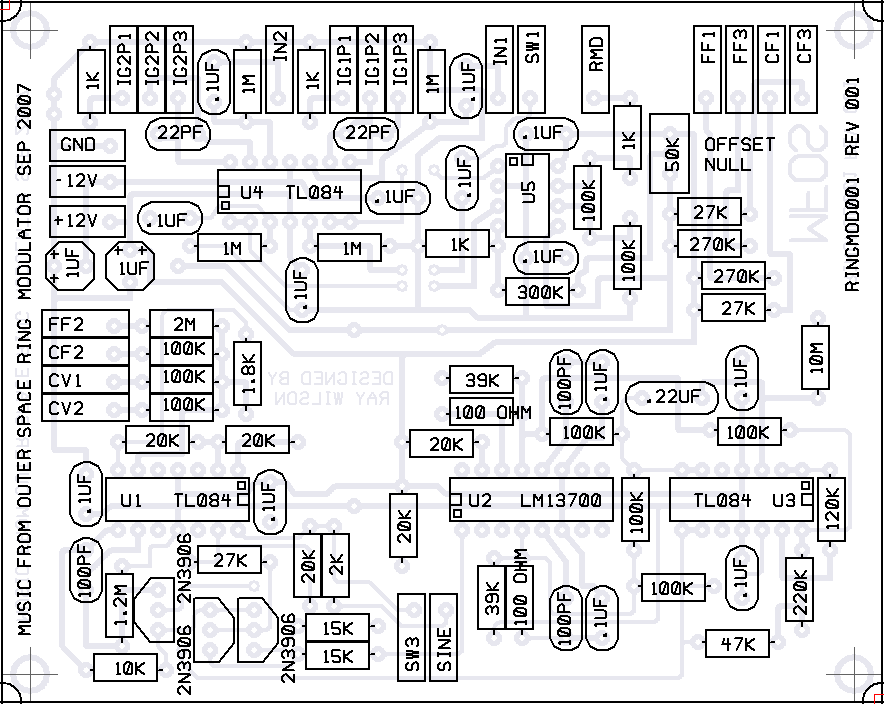
SONIC MULTIPLIER PCB Parts Layout (Parts Side Shown) PDF
SONIC MULTIPLIER PCB Parts Layout (Values Shown) PDF
SONIC MULTIPLIER Prototype

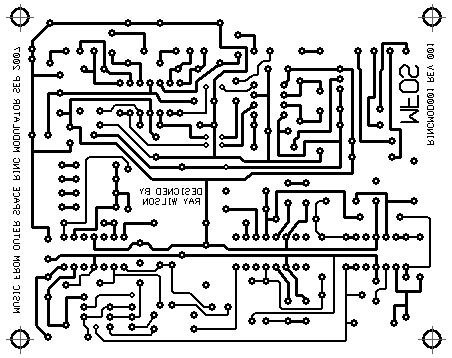
SONIC MULTIPLIER PCB Bottom Copper (Parts Side Shown)
| This image needs to be scaled so that DIP pad centers are spaced 1/10" apart (and 3/10" apart for pins across from one another). Consult your graphics aware friend for how to do that if you need to. |
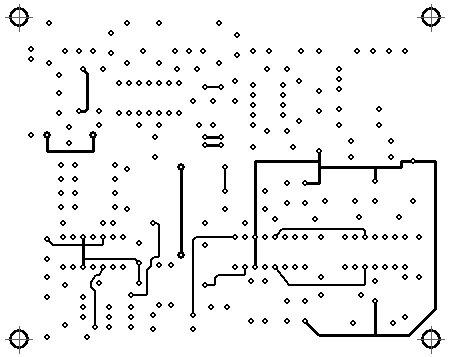
SONIC MULTIPLIER PCB Top Copper(Parts Side Shown)
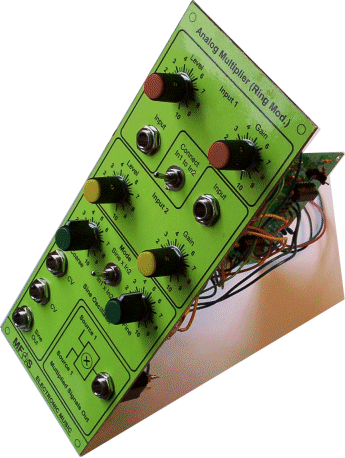
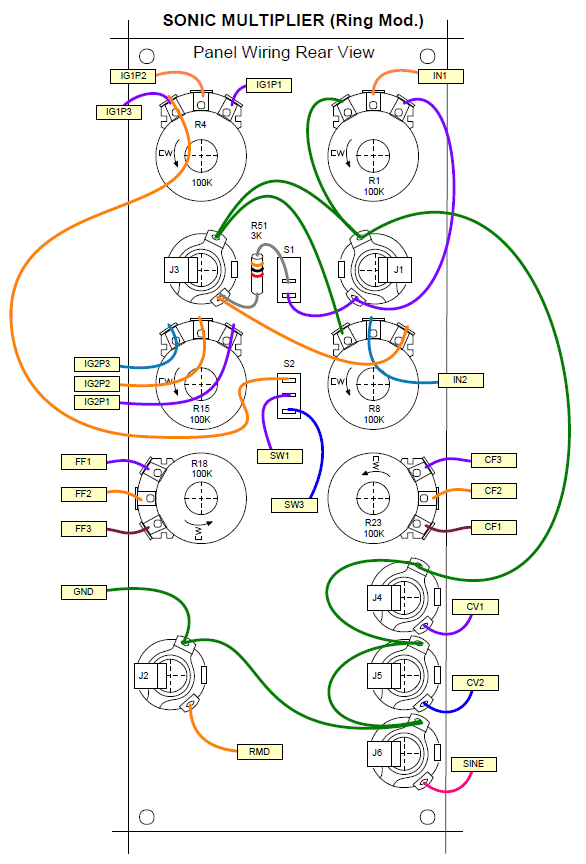
SONIC MULTIPLIER Front Panel (PDF) SONIC MULTIPLIER Panel Wiring PDF
I recommend using an aluminum panel so that it can be attached to ground and thus ground all of the pot bodies. This will reduce EMI.

|
|
SONIC MULTIPLIER Project Parts List
*** Dual Inline Package (plastic or ceramic)
| Qty. | Description | Value | Designators |
|---|---|---|---|
| 1 | AD633AN (or AD633JN) Low Cost Analog Multiplier | AD633AN (or AD633JN)*** | U5 |
| 1 | LM13700 Dual gm OpAmp | LM13700 *** | U2 |
| 3 | TL084 Quad Op Amp(s) | TL084 *** | U4, U3, U1 |
| 3 | 2N3906(s) | 2N3906 | Q1, Q2, Q3 |
| 14 | Ceramic Capacitor(s) | .1uF | C3, C1, C4, C9, C15, C10, C16, C7, C13, C8, C14, C6, C12, C2 |
| 1 | Ceramic Capacitor | .22uF | C20 |
| 3 | Ceramic Capacitor(s) | 100pF | C19, C18, C17 |
| 2 | Ceramic Capacitor(s) | 22pF | C22, C21 |
| 2 | Electrolytic Capacitor(s) | 1uF | C5, C11 |
| 6 | Potentiometer(s) | 100K | R8, R1, R4, R15, R23, R18 |
| 1 | Trim Pot | 50K | R16 |
| 1 | Resistor 1/4 Watt 5% | 1.2M | R30 |
| 1 | Resistor 1/4 Watt 5% | 1.8K | R27 |
| 2 | Resistor 1/4 Watt 5%(s) | 100 OHM | R39, R40 |
| 9 | Resistor 1/4 Watt 5%(s) | 100K | R12, R7, R36, R38, R37, R43, R33, R25, R26 |
| 1 | Resistor 1/4 Watt 5% | 10K | R22 |
| 1 | Resistor 1/4 Watt 5% | 10M | R47 |
| 1 | Resistor 1/4 Watt 5% | 120K | R46 |
| 2 | Resistor 1/4 Watt 5%(s) | 15K | R31, R32 |
| 4 | Resistor 1/4 Watt 5%(s) | 1K | R11, R3, R14, R5 |
| 4 | Resistor 1/4 Watt 5%(s) | 1M | R9, R2, R13, R6 |
| 5 | Resistor 1/4 Watt 5%(s) | 20K | R34, R35, R29, R49, R28 |
| 1 | Resistor 1/4 Watt 5% | 220K | R41 |
| 2 | Resistor 1/4 Watt 5%(s) | 270K | R17, R19 |
| 3 | Resistor 1/4 Watt 5%(s) | 27K | R48, R21, R24 |
| 1 | Resistor 1/4 Watt 5% | 2K | R45 |
| 1 | Resistor 1/4 Watt 5% | 2M | R20 |
| 1 | Resistor 1/4 Watt 5% | 300K | R10 |
| 2 | Resistor 1/4 Watt 5%(s) | 39K | R42, R44 |
| 1 | Resistor 1/4 Watt 5% | 3K | R51 |
| 1 | Resistor 1/4 Watt 5% | 47K | R50 |
| 1 | SPDT Switch | SPDT | S2 |
| 1 | SPST Switch | SPST | S1 |
| 6 | 1/4" Phone Jack(s) | J1, J3, J2, J4, J5, J6 |
Miscellaneous
- (1) 1/16" thick Aluminum plate for mounting the pots and switches.
- Assorted hardware 1" 6-32 nuts and bolts, 1/2" #8 wood screws, etc
- Knobs for potentiometers, wire, solder and typical assorted electronics hand tools.
- Volt Meter and an Amplifier (or oscilloscope) for testing and enjoying.