Ray Wilson authored this content while he was actively running MFOS as the founder and resident genius.
We retain the content because it reflects a valuable point of view representing that time and place.
Article by Ray Wilson
Introduction
Here is some information and photos related to my vocoder build and the vocoder kit. I suggest you look it over to see what's what before you get started or order anything. As I get questions or think of additional information I'll add it here.
This is a "Level 3 Advanced" project. If you (or your friends or your school) have the electronics experience and tooling necessary for building diy projects of this magnitude go for it. It's a great project. If not, or if you're just getting started in diy I really don't recommend it. I would start with a smaller project with less to trouble-shoot in the event the need arises. But, again, let your experience be your guide. For an experienced electronics person this circuit is very straight forward with the same circuit elements repeated several times. The operation is described fully on the schematics pages which I always highly encourage people to read thoroughly before ordering boards or kits.
What Comes in the MFOS Vocoder Kit? Vocoder Parts List PDF
You get all of the parts listed in the parts list on the main vocoder page in the kit. Additionally you get 25' of 22 AWG stranded wire and 15' of thin coax with excellent shielding and high reliability sockets for all ICs. No documentation comes with the kit. All documentation is on-line where I can keep it up to date and you can access it 24x7. Print out anything you need from the site for constructing the project as well as for your project documentation records.
All Semiconductors & Trim pots

All Resistors

All Capacitors

Mounting Hardware

PC Board, Panel Components and Wire (15' of Coax and 25' of Stranded 22 AWG Wire)

This is definitely a DIY project for which you have to supply the rack mount case. You may opt to use a 2U high rack case so you have plenty of room for the project and perhaps some future mods. You will need to drill the panel component mounting holes in the front panel and apply labeling (well... apply labeling is a judgement call in diy).
You have to supply a dual power supply capable of comfortably supplying 100mA from both the +12V and -12V sources. The MFOS wall wart power supply will fit comfortably within the height of a 2U high rack case and the AC power transformer will automatically be remotely located to reduce EMI. I never suggest computer power supplies for projects but let your experience be your guide.
Populating the PC board
I like to put each value of component on the board one at a time. So for instance I will install all of the 100K resistors and then all of the 10K resistors etc. Install about 5 of the current component value you're working with and then solder them. Leaving components unsoldered is right up there with forgetting wires on the front panel as far as mistakes that will cost you trouble shooting time later so take your time, pay attention to details and solder all solder joints. I missed a few solder joints while building mine and it was a pain tracking them down especially since they were making an intermittent contact even though unsoldered.
I use a Pana-vise to hold my PC board while soldering and I both install and solder most components from the top of the PC board. The solder flows nicely through the plated through holes to the bottom pad of the PC board making a nice bottom fillet. Sockets, some caps, and other components are impossible to solder from the PC board top so for those components you need to either hold them in place while flipping the board and soldering their leads or use some tape to hold the component in place while you flip the board to solder it. The leads can get as hot as the tip of the soldering iron so watch you don't burn yourself. Try not to get the tape on component leads that will actually be soldered so you don't cook tape residue onto your component's leads.
Values and Color Codes for 5% 1/4 Watt Resistors Used in this Project
When you get your kit you should take an inventory of the components. Use the parts list to make sure you have the correct amount of each resistor value. For some values we round to the closest multiple of five (above the necessary amount). These are the colors of the values. You should inspect the resistors in good light because the colors can sometimes be subtle in shade. For example I have seen violet be almost as dark as black but under a good light it's easy to see the difference. If obtaining your own components, tighter tolerance components can always be substituted for lower tolerance components. Going the other way is asking for poor performance.
I don't use tons of plastic bags so all resistors are consolidated into one baggy. Resistors with quantities above about five are tape and reel so it won't be as difficult as all that to separate them.
Capacitors Used in this Project and Possible Markings
The capacitors sent with a kit may have one of a variety of markings so here is a table to show what each value may be marked as. You should inventory the capacitors that come with your kit as well. We make every effort to get the parts you need into the box but we are only human. The huge industrial robots would not fit into my basement so I'm doing this by hand. If something is missing just let me know and I'll send it. If obtaining your own components, tighter tolerance components can always be substituted for lower tolerance components. Going the other way is asking for poor performance. The voltage rating of the caps should be above 12V. I recommend using caps rated for at least 16V.
As with the resistors the caps all come in one bag (the earth is drowning in plastic). The most numerous are tape and reel so it won't be that difficult to inventory them. A good light and a magnifier will aid in reading the values.
| .1uF | 100nF | 104 | 100n |
| 100pF | 101 | ||
| .015uF | 15nF | 153 | 15n |
| 47pF | 470 | ||
| .022uF | 22nF | 223 | 22n |
| .033uF | 33nF | 333 | 33n |
| .047uF | 47nF | 473 | 47n |
| 1uF | |||
| 100uF | |||
| .01uF | 10nF | 103 | 10n |
| .001uF | 1nF | 102 | 1n |
| .0022uF | 2.2nF | 222 | 2n2 |
| .0047uF | 4.7nF | 472 | 4n7 |
| .0033uF | 3.3nF | 332 | 3n3 |
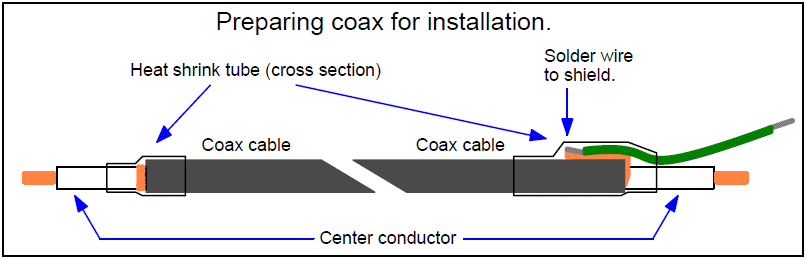
Preparing Coax
I use this method pf preparing coax to avoid dealing with the actual shield wires which can be unruly and sources of shorts. This way you just have to connect the center conductor and a piece of stranded 22 AWG wire (which is soldered to the shield) at the front panel. On the board side you connect the center conductor of the coax only and use heat shrink to insulate the folded back or trimmed shield braid.
Coax from PCB to Front Panel
Here is a closeup of an instance where coax wire is used to connect from the panel to the PCB. Notice that I only ground the panel side of the coax using the method shown in the coax wiring illustration to avoid having to deal with the sometimes awkward shield wires.
In this instance I had ground wires from four coax wires to connect to ground so I added a fith wire to the bundle soldered them together and added insulating heatshrink tubing over the bundle and, then I connected the other end of the fifth wire to a convenient front panel ground location.

Coax from Front Panel to PCB
Here is a closeup of several instances where coax wire is used to connect from the panel to the PCB. I have completely insulated the ground shield via heat shrink tubing only the center conductor is connected on the PCB side.

Flying Components
The output level pot is connected directly to flying components C3 (1uF bipolar electrolytic) and R9 (100 ohms). Using either an axial or a radial style cap is fine here. R9 connects to the output jack's (J2) tip connector.

More Front Panel Components
In the two instances where three coax wires go to the switch leads I combined three short coax cable runs via heat shrink tube to corral the connections. I also consolidated the ground connections of the three coax to one piece of 22 AWG wire which simplified the panel ground connection for these three wire runs.

Why I Switched the Panel Locations of Voice and Audio Inputs
As Benjamin Franklin, that ladies man of a granny glass wearing scoundrel used to say: Haste... makes waste. I should have noticed this when I was laying out my panel but I was in a rush to finish the project. The layout on the main project page has been corrected so your wiring won't be crowded and crossed over.

I Used the Wall Wart Supply - But...
I used the MFOS Wall Wart supply for my project but as you can see it's a Frankenstein of a prototypical build (like most of my own stuff) so I don't care that it doesn't have a complete enclosure. I have rack space for it and it doesn't make noise or hum so for now I'm using it. My go-karts don't have brakes either - what can I say. If it ever really bothers me that it doesn't have a case I promise I'll build one.

Look Ma - 22 AWG Wire
I used plain old 22 AWG stranded wire for a few connections. See the wiring diagram on the Home tab to see which connections get coax and which will be OK with just stranded 22 AWG wire.

The Whole Enchilada
Here is a view of the project taken with my - not the greatest - camera. If you click on it you'll get a gigantic view of the project.

Mollster the Bollster
Molly the MFOS mascot keeps me company and lets me know when anyone is in the neighborhood. She's my little girl. She just got back from a mission under the deck and needs a little rest in the autumn sun.
