Ray Wilson authored this content while he was actively running MFOS as the founder and resident genius.
We retain the content because it reflects a valuable point of view representing that time and place.
Article by Ray Wilson
Sound Effect Oscillators Schematic (Page 1) PDF
The "Sound Effect Oscillators" are as the name implies basically for sound effects. They are simple oscillators not meant for equally tempered music but as a signal source to produce bird calls, sirens, bells (via intra-oscillator modulation), drones, etc.I am going to describe the operation of Oscillator 1 located at the top of Schematic Page 1 Sound Effect Tri/Square Oscillator Section. For more information regarding using the LM3900 for a voltage controlled oscillator see National Semiconductor Linear Applications Handbook AN72-24. Oscillator 2 functions in exactly the same manner as Oscillator 1 and thus it's operation will not be described.
In order to provide a control voltage mixer function for the oscillator I used one op amp of a TL074 (quad op amp) U1-D. The CV mixer resistors 270K R2 and 100K R5, and R8 all junction at U1-D's non-inverting input along with the non-ground side of R9, 1K resistor. Panel mounted 100K Potentiometer R1 is used to allow the setting of the starting frequency of oscillator 1 manually. It's wiper is attached to point X1. Control Voltage inputs X2 and X4 expect between -3 and +3 volts to drive the oscillator's frequency from it's lowest (in the area of 20Hz) to near 4.5KHz respectively. Since the control voltage is attenuated by about 100 in the input mixing section we add gain to U1-D with R20 a 200K feedback resistor and R18 and R19 forming a 2K resistor to ground. We bias the output of the CV mixer (U1-D) up by means of R17 270K resistor to -V so that the expected input voltage which is bipolar (-3V to +3V) about ground is changed to be completely in the positive voltage realm which is just slightly above ground to near +V minus 2V or so. This is because U2 LM3900 quad Norton op amp is being powered by only the positive half of the bipolar supply and operates completely in the positive voltage realm (in this circuit).
The voltage present on the output of U1-D is applied directly to the "inputs" of the integrator formed from U2-A and C1 a .01uF ceramic capacitor. With Q1 off due to the output of U2-B being low, current flows into the 2 inputs of the integrator via R10 and R14. Twice as much current is flowing into the integrator via R10 7.5K resistor (I2) than via R14 15K resistor (I1) so the output side of the capacitor charges to push (I2 - I1) current to the non-inverting input to balance the current flowing into the inputs. When the output of the integrator U2-A pin 5 goes above the threshold voltage of the schmitt trigger formed by U2-B, R7, R11, and R15, U2-B's output goes high. U2-B's output stays high until the voltage on U2-A pin 5 goes below the low threshold voltage of the schmitt trigger. Once U2-B goes high it turns on the clamping transistor Q1 via current limiting resistor R6 100K which grounds the non-inverting input of U2-A stopping the current that was flowing through R10 to U2-A's non-inverting input from doing so. Now the current through R14 into the inverting input of the integrator causes the output to ramp down at a rate sufficient to balance the current flowing into and out of the inverting input. The ratios of the input resistors and subsequent currents in the circuit are such that the charging and discharging currents are ideally the same and the resulting triangle waveform at the output of the integrator is somewhat symmetrical and the output of the schmitt trigger is somewhat square. I said "ideally" and "somewhat" so you are not disappointed when the waveforms are quite skewed on the lower end of the range. However the oscillator oscillates, has a decent frequency range and provides both square and triangle wave timbres, which is just what we need in a "Sound Effect" oscillator. Since the frequency is related to the currents flowing into the input resistors R10 and R14 the frequency goes up if you apply a higher control voltage and it goes down if you apply a lower control voltage. As mentioned earlier the range is approximately from 20 or so Hz to 4.5KHz or so.
I must emphasize again that the oscillator is linear in response to voltage and not logarithmic.
U1-C is used to buffer the output of the oscillator and to level shift it to oscillate about ground. Remember that U2 is powered from ground and +V so the output of the oscillator is all in the positive voltage realm. We bias up the inverted output of U1-C with divider R3 and R4. S1 allows selection of either the square wave or the triangle waveform. Notice that we apply the far higher in amplitude square wave (near V+ to -V in amplitude) to U1-C via two 15K resistors in series (R16 and R32) whereas the lower amplitude triangle wave is applied via one 15K resistor. This is so the square and triangle waves output from U1-C (pin 8) are somewhat similar in amplitude. It is not crucial that they be exactly the same but they will be in the range of plus and minus 2 to 3 volts. R13 20K is the gain set feedback resistor for U1-C.
C3 and C4 are used as bypass capacitors for this section of circuitry.

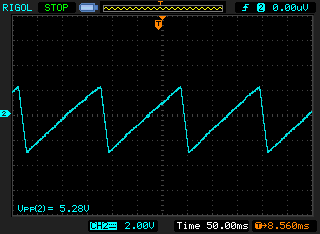
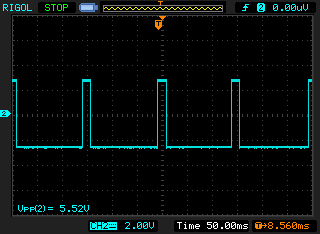
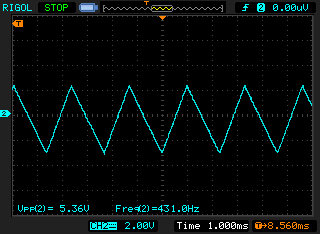
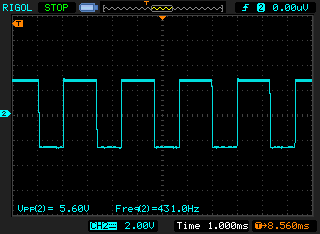
Sound Effect Oscillators Scope Photos
These are typical waveforms. At low frequencies there is far less symmetry as can be seen in the photos below.
| Triangle Waveform Low Frequency | Rectangle Waveform Low Frequency |
|
|
| Triangle Waveform 431 Hz. | Rectangle Waveform 431 Hz. |
|
|
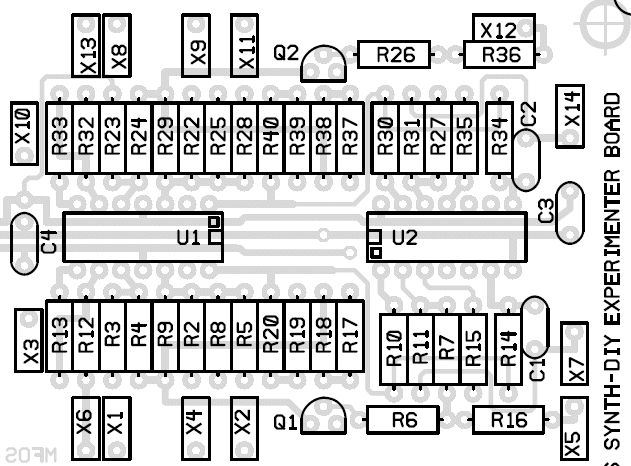
Sound Effect Oscillators PCB Section Parts Layout (Parts Side Shown)
I find this one useful for trouble shooting since the designators on the PC board are covered by the installed components.
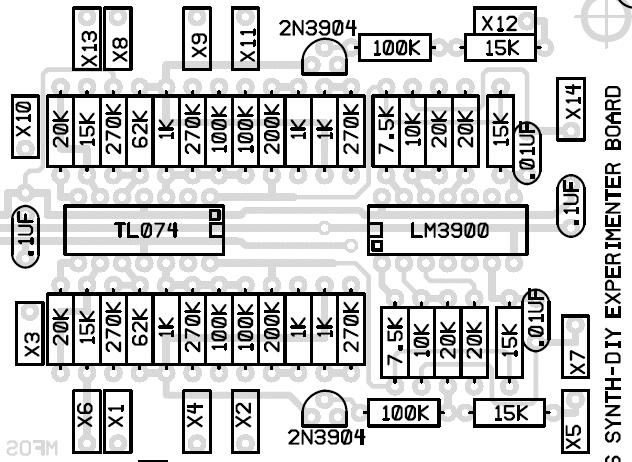
Sound Effect Oscillators PCB Section Part Value View (Parts Side Shown)
I find this one useful for populating the PC board since I don't have to continually refer back to the schematic to know the value for a designator.
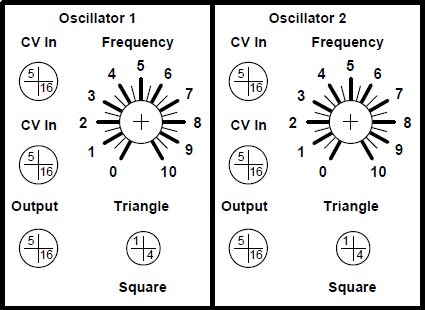
Sound Effect Oscillators Front Panel Template
These front panel layouts are suggestions and are meant to illustrate the circuit's user interface and wiring between the panel and the PC board. I'm certain you can come up with a much cooler looking panel but this utilitarian version will certainly work to get you started.
Sound Effect Oscillators Front Panel Wiring

Sound Effect Oscillators Project Parts List (See "Full Parts List" tab for Complete List)
Resistor Color Chart For Resistors Used In This Circuit
The resistors should be carbon composition or carbon film.Use 1/4 watt resistors because 1/2 watt will be too big for the board.
| Qty. | Description | Value | Designators |
|---|---|---|---|
| 1 | LM3900 Quad Norton Op Amp | LM3900 | U2 |
| 1 | TL074 Quad Op Amp | TL074 | U1 |
| 2 | 2N3904 | 2N3904 | Q1, Q2 |
| 2 | Potentiometer Linear Taper | 100K | R1, R21 |
| 6 | Resistor 1/4 Watt 5% | 100K | R5, R6, R8, R25, R26, R28 |
| 2 | Resistor 1/4 Watt 5% | 10K | R11, R31 |
| 6 | Resistor 1/4 Watt 5% | 15K | R12, R14, R16, R32, R34, R36 |
| 6 | Resistor 1/4 Watt 5% | 1K | R9, R18, R19, R29, R38, R39 |
| 2 | Resistor 1/4 Watt 5% | 200K | R20, R40 |
| 6 | Resistor 1/4 Watt 5% | 20K | R7, R13, R15, R27, R33, R35 |
| 6 | Resistor 1/4 Watt 5% | 270K | R2, R3, R17, R22, R23, R37 |
| 2 | Resistor 1/4 Watt 5% | 62K | R4, R24 |
| 2 | Resistor 1/4 Watt 5% | 7.5K | R10, R30 |
| 2 | Capacitor Ceramic | .01uF | C1, C2 |
| 2 | Capacitor Ceramic | .1uF | C3, C4 |
| 2 | Switch SPDT | SPDT | S1, S2 |
Miscellaneous
- 1/16" thick aluminum plate for mounting the pots and switches.
- Assorted hardware 1" 6-32 nuts and bolts, 1/2" #8 wood screws, etc
- Knobs for potentiometers, wire, solder and typical assorted electronics hand tools.
- Digital volt meter and a signal tracer or oscilloscope for testing.