Ray Wilson authored this content while he was actively running MFOS as the founder and resident genius. We retain the content because it reflects a valuable point of view representing that time and place.
Modular Synth Cabinet HOW-TO
Article by Ray Wilson
IntroductionSo you're considering going for it, building your very own modular analog synthesizer. Maybe you're a young student on the way to an EE degree or you're a recently retired person that has always wanted to build their own analog modular synthesizer. Perhaps you're a musician with electronic skills and you're looking forward to the day that you have a mountain of electronic analog modules to experiment and play with. Well no matter what, you've come to the right place. I'll share the synth cabinet making experience I've gained over the years with you and hopefully your project will go more smoothly than my early efforts.This is not going to be a "cut this piece to x inches" and "cut that piece to y inches" type of guide but rather some general how-to guidelines that will hopefully spark your creativity. You will definitely need some wood-working tools to succeed with any modular cabinet project. A crosscut saw, a square, a drill and various sized bits, wood-glue, phillips screwdriver, screws (detailed below), etc. Don't forget to bring your imagination and ingenuity. I can't emphasize enough the value of reading over the material thoroughly before picking up a tool or buying anything. As they say - the devil is in the details. |

|
Making A DIY Synth Cabinet
Making cabinets for your DIY synthesizer can seem daunting but it's really not very difficult. Right up front you need to think about what size you want your modules to be since that is one of the major factors determining the size of the cabinets. There are many manufacturers of modular synth equipment and there are about as many sizes of module plate out there. If you want your cabinet to accomodate a particular manufacturer's modules in addition to your own DIY modules then use their module size as your standard. Here are some great pages showing size comparison charts. Blacet Module Spec. Comparison Chart Synthesizers.com Module Spec. Comparison Chart I have designed several faceplates (including wiring diagrams) for many of the MFOS synth module projects using the 3.5" x 8.75" format. If the one you need is missing let me know and I'll add it. MFOS 3.5" x 8.75" Panel TemplatesChoose a Jack Type
Another choice that you'll need to make is the type of jacks you use. There are three predominant types in use:- 1/4" Phone Jack
- Banana jack
- 3.5mm or 1/8" Phone Jack
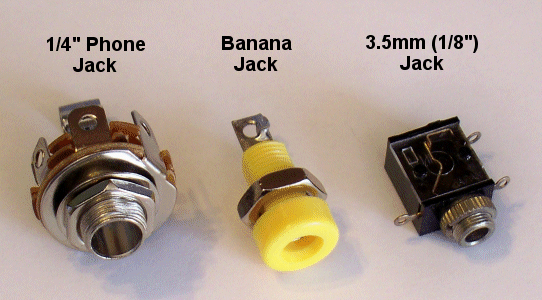 Again there are many modular makers out there and if you want to be compatible you need to know the jack style they use.
The charts from Synthesizers.com and Blacet Research come in handy again as they list the jack types used by the major modular suppliers.
Blacet Module Spec. Comparison Chart
Synthesizers.com Module Spec. Comparison Chart
Electrically, using 1/4" phone jacks or 3.5mm phone jacks is the same. Both types of jacks are two conductor and
provide a ground connection in addition to the signal connection. The wires used with these jacks are generally
shielded coaxial. If you decide to use banana jacks I suggest you include a banana jack somewhere that is just a ground
connection. The reason is this. Coax cables used with the phone type jacks connect the grounds of the equipment
connected by means of them. Banana jacks, on the other hand, are single conductor and within the synth they are being used on
they don't need to carry grounds because all of the modules have a common ground already. But... if you want to connect to
another piece of equipment you need to make a signal ground connection available from your banana jacked equipment
so you can connect it to the ground of whatever other piece of equipment you want to control (or be controlled by).
Without some common ground two different pieces of equipment will be very rude to one another.
Again there are many modular makers out there and if you want to be compatible you need to know the jack style they use.
The charts from Synthesizers.com and Blacet Research come in handy again as they list the jack types used by the major modular suppliers.
Blacet Module Spec. Comparison Chart
Synthesizers.com Module Spec. Comparison Chart
Electrically, using 1/4" phone jacks or 3.5mm phone jacks is the same. Both types of jacks are two conductor and
provide a ground connection in addition to the signal connection. The wires used with these jacks are generally
shielded coaxial. If you decide to use banana jacks I suggest you include a banana jack somewhere that is just a ground
connection. The reason is this. Coax cables used with the phone type jacks connect the grounds of the equipment
connected by means of them. Banana jacks, on the other hand, are single conductor and within the synth they are being used on
they don't need to carry grounds because all of the modules have a common ground already. But... if you want to connect to
another piece of equipment you need to make a signal ground connection available from your banana jacked equipment
so you can connect it to the ground of whatever other piece of equipment you want to control (or be controlled by).
Without some common ground two different pieces of equipment will be very rude to one another.
I like to use 1/4" jacks on my modular but banana jacks on my single board stand alone synths because they are simple to wire and small in size.
How Many Modules Do You Want In Each Cabinet?
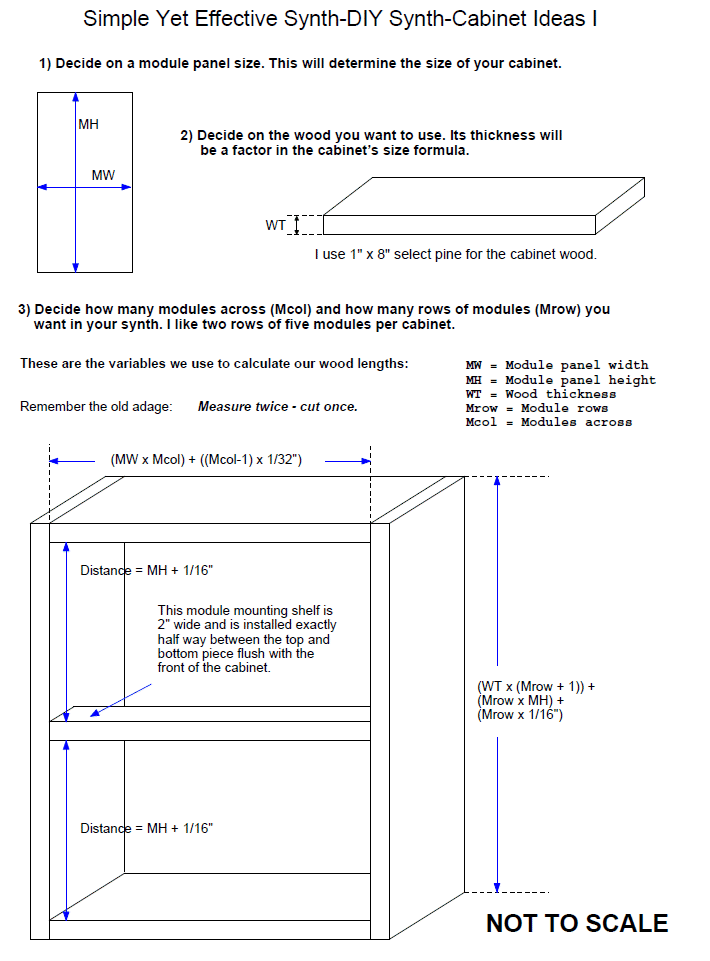
Additionally you must consider how many rows high and how many modules wide you want your cabinet to accomodate. I like to put 10 modules in a cabinet as 2 rows of 5. I also put a dual power supply in each cabinet so that all modules are powered without taxing the supply. If the modules of two cabinets (20 modules using the 2 row 5 across approach) only consume about 60% to 75% of your power supply's current delivering capacity then you can put the power supply in one cabinet and run it to the other cabinet using a polarized, reliable connector scheme. The three-conductor power connectors from old computers can be harvested and reused for this.- MW = Module Panel Width
- MH = Module Panel Height
- WT = Wood Thickness
- Mrow = Module Rows
- Mcol = Modules Across.
The formula takes all of those things into consideration as far as the lengths of the sides but you must be careful to position the shelves properly. The extra 1/16" of space for each row is to allow for wood expansion and contraction. If you feel that's too much wiggle-room, slop, slough, whatever you like to call it, then reduce it to your preference.
There is also wiggle room taken into consideration between the adjacent module plates in a row. That is the ((Mcol - 1) x 1/32") term that insures 1/32" of space between the module plates.
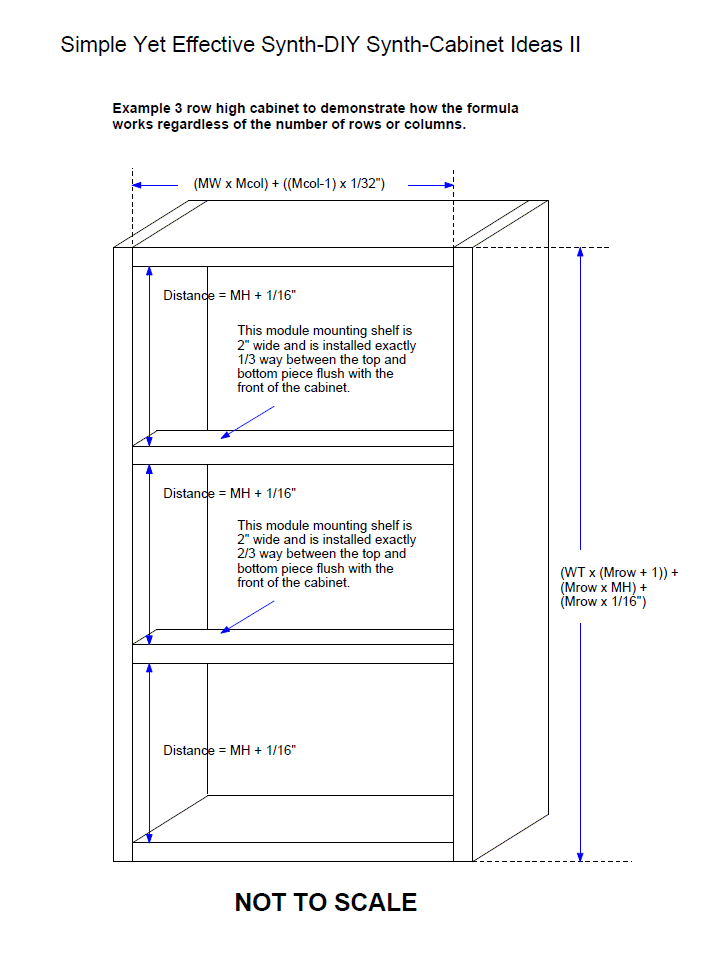
 In this illustration you can see that the formula holds regardless of the number of rows of modules you decide on.
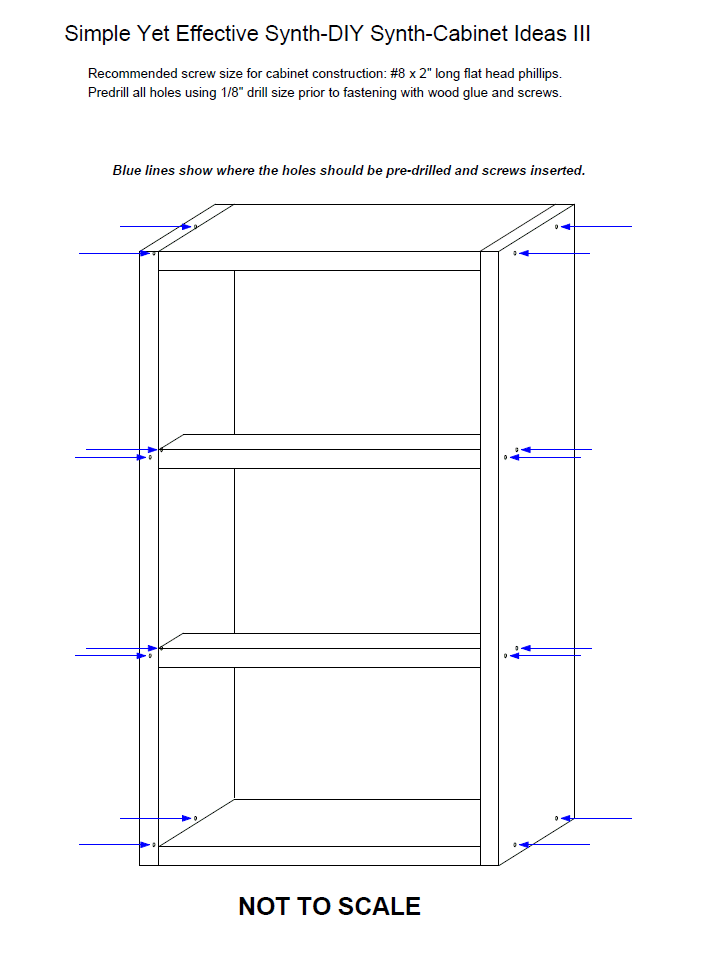
Assemble the Cabinet Sides and Module Shelves
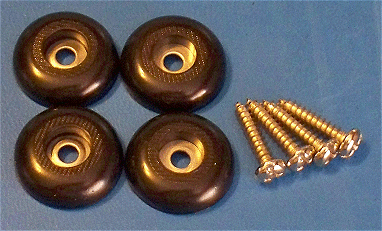
Here is an image of the screws I use for cabinet construction, module mounting strip attachment, and module mounting.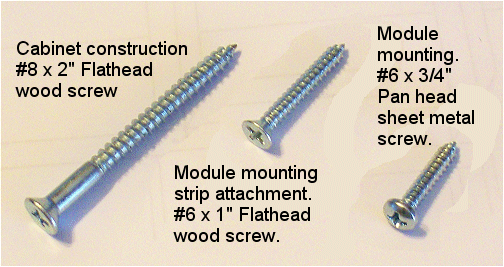 Carefully drill the holes for the #8 2" wood screws using a 1/8" drill bit. If possible clamp the pieces together during
drilling so that they don't move causing a mis-drill. Using wood glue and the #8 2" screws attach the sides and then
the module mounting shelves together.
Carefully drill the holes for the #8 2" wood screws using a 1/8" drill bit. If possible clamp the pieces together during
drilling so that they don't move causing a mis-drill. Using wood glue and the #8 2" screws attach the sides and then
the module mounting shelves together.
Once this step is complete I recommend that you sand and finish the case using paint, stain and polyurethane or varnish. You could wait until after mounting the module mounting strips (next phase) but no one sees those anyway.
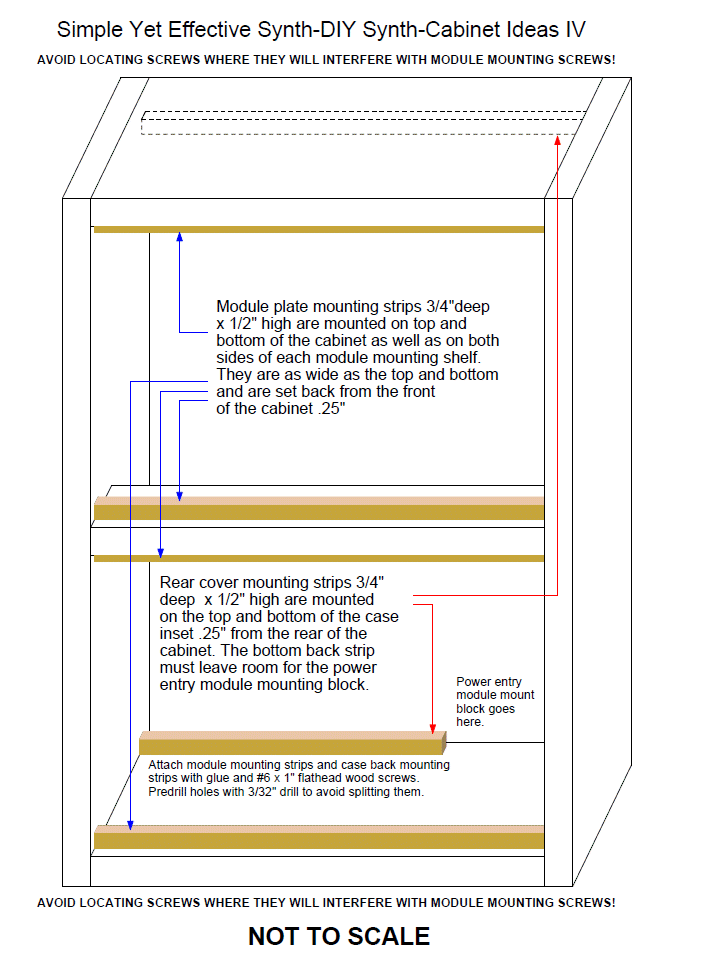
Attach the Module Mounting Strips
The next thing you want to do is attach the module mounting strips. These are 3/4" x 1/2" strips cut to the same length as the top, bottom, and mounting shelf (shelves). They get attached to the inside surfaces of the top and bottom of the cabinet and to the top and bottom surfaces of each module mounting shelf. Mount them so that they are 1/2" tall and provide 3/4" of depth for the module attachment. They must be inset 1/4" from the face of the cabinet. The modules will eventually be attached to them with #6 3/4" pan-head sheet metal screws.
If you decide to put back covers on your cabinets I suggest using thin Masonite. Two of the same module mounting strips should be mounted to the inside surfaces of the top and bottom of the rear of the cabinet. Be sure and take into consideration where the power will enter your cabinet and leave a gap in the case-rear mounting strip for it (power entry module covered later). They should be inset about 1/8" from the rear opening. For attaching the rear of the cabinet I suggest using Velcro strips with adhesive backing so you can easily access the interior of your synth for calibration, trouble-shooting, or moving modules around. You may also want to add some additional rear cover supports to the sides of the cabinet so the back doesn't bow in. However, read over the section about the power rails first because the power rails will be run on the insides of the sides of the cabinet.
If you use panel backs you need to allow the cabinet to vent the heat generated by the power supply so be sure and add some nice big holes near the supply's transformer and heat-sinked regulators. Otherwise temperature sensitive components will be affected by heat build-up inside the cabinet (tempcos can only do so much).
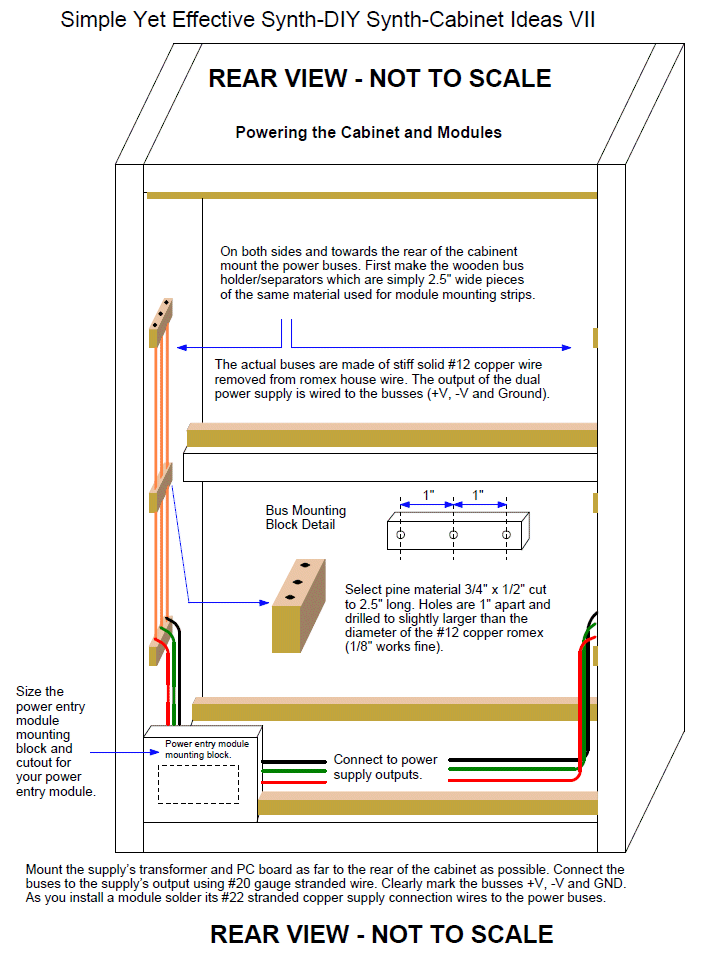
Be sure and leave space in the bottom case-back mounting strip for the power entry module mounting block (covered later).
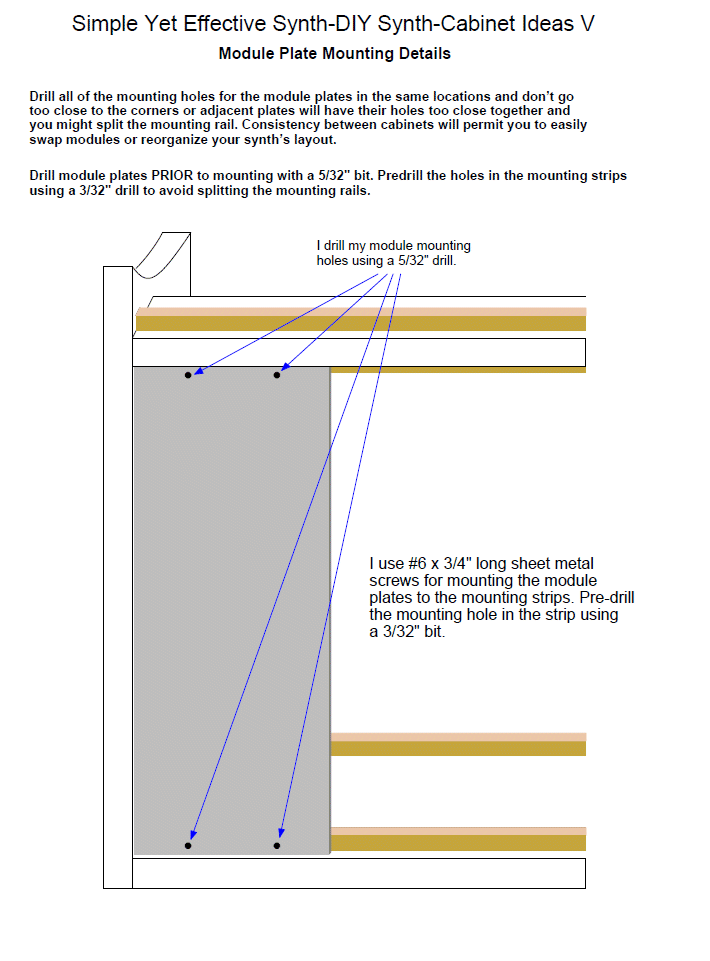
Module Plate Mounting
If I can share one important thing that I wish I had done all along it would be to make everything consistent in size. The cabinets, the module plates and the position of the module mounting holes. When you do life is a dream and you can easily reconfigure your synth and move modules from one cabinet to another. When you don't it's inconvenient and you end up cussing yourself out.The greatest place I have found to get metal cut to size at very reasonable prices is Metal Supermarkets - The Convenience Stores For Metal. Two of the many features they provide are: no minimum order and metal cut to size.
For my plates I order this aluminum sheet material: 0.063" ALUMINUM 6061 T6 SHEET. When drilling holes in this material I recommend using a light cutting oil (WD-40 works perfectly) to ease drilling and minimize burring.
Drill hole sizes for some common components
| Component | Drill Hole (inch) | Drill Hole (mm) |
| Mini-toggle switches | 1/4 in. | 6.35 mm |
| 1/4" phone jacks | 3/8 in. | 9.53 mm |
| Banana jacks | 5/16 in. | 7.94 mm |
| 3.5mm or 1/8" jacks | 1/4 in. | 6.35 mm |
| Most potentiometers | 5/16 in. | 7.94 mm |
| Gen Purpose 0.2" LEDs | 13/64 in. | 5.08 mm |
| Plate Mounting holes | 5/32 in. | 3.97 mm |
Never drill the module plate's mounting holes right in the corners because when you do adjacent modules have their mounting holes too close together and you can split the wooden mounting rail. I suggest that you drill the module mounting holes in the module plates 1" from the sides and 3/16" from the top and bottom edges. Again consistency is the key.
You will need to pre-drill the holes in the actual mounting strips before attaching module plates with #6, 3/4", pan-head sheet metal screws. I suggest you use two of your module plates as templates to mark all of the holes for the rails. Place one plate against the right side of the cabinet and then mark its holes with a sharp pencil. Place the second plate up against it (remembering to allow for the 1/32" space between adjacent plates) and mark it's holes. Leap-frog the plates and mark as you go, being careful to hold the one plate securely as you move the other.
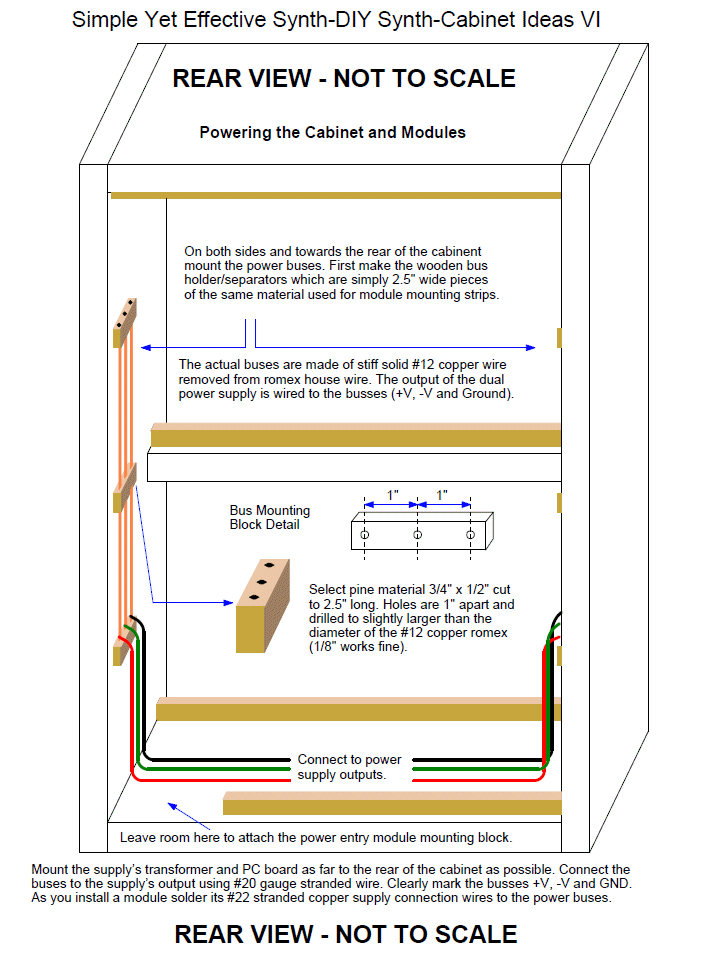
Powering the Cabinet and Modules
As I said the purpose of the cabinet is to both securely hold your modules and power them. To do that we need to install a power supply and the power rails. Mount your power supply's transformer and PC board as close to the rear of the cabinet as you can making sure not to interfere with the rear cover (if used).The power rails are made from #12 gauge solid copper wire removed from house wiring wire (Romex). Straighten 6 lengths of the wire long enough to go from the middle of the lowest module mounting area to the middle of the top module mounting area. These wires are run through the bus holder blocks which will be mounted (with the bus wires installed) on both sides of the cabinet.
The bus mounting blocks are made from the same material as the module mounting strips (3/4" x 1/2" pine). They should be about 2.5" long and the holes for the bus wires should be drilled with 1" between them using a 5/64" bit. I go with one hole in the center and then one hole .25" from each side. Drill two holes for mounting the bus blocks using a 1/8" bit being careful to drill the holes between the bus wire holes. When you mount the blocks use a 7/64" bit to predrill the holes in the sides of the cabinet.
Put the wires through the blocks and then use your vise to flatten and enlarge the last 1/8" of both ends of each bus wire. Doing so will prevent them from slipping out of the bus blocks and causing havoc.
Run 20 gauge stranded wire from the dual supply's outputs and solder them to the bus wires on both sides of the cabinet.
To use a connector scheme or not, that is the question. I solder the power connections of my modules to the power buses directly using #22 stranded wire. You may want to find a 3 conductor - mechanically polarizing - connector scheme to use between the power buses and your modules. If you don't use a connector that ensures that the power is connected in the correct polarity the dark day will come when you connect one of your favorite modules to the supply backwards and fry it.
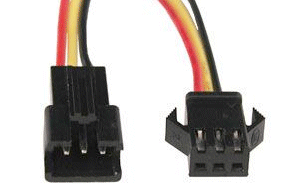
Here is the kind of thing you can find surplus at All Electronics. It would be perfect for soldering one end to your module's supply wires and the other end to the power buses. These have 12" of wire on both connector components and the connector only goes together one way, which is exactly what you want.
I can't emphasize how important it is to make sure all wires are connected properly. Avoid smoke, fire, burned up modules... connect the wires properly.
Clearly mark the buses as to which is +V, -V and ground. I write on the inside of the cabinet with a black Sharpee pen.
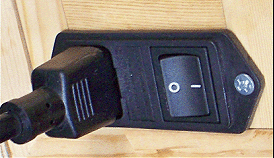
Mount the Power Entry Module
|
I like to use one of these power entry modules that permit the AC line cord to be removed and has an integral emi filter, switch and fuse built in for interfacing to the mains. I bought about 10 of these from All Electronics when they had some at surplus prices. I suggest you search online for 'power entry module' and you'll find many sources. Make sure you get one with mounting wings designed to be mounted using screws. You should be able to get one for from between $5.00 and $20.00 if you look around a bit. Mouser and Digikey definitely both carry them but you will pay the non-surplus price. EIC and Delta are companies that manufacture them which may help with your search. |
Finishing Touches
It's a lot easier to carry your synth from gig to gig when it has a handle. Guitar amp handles are perfect. Mojotone carries a bunch of them. Go to Mojotone and search for 'amp handle'.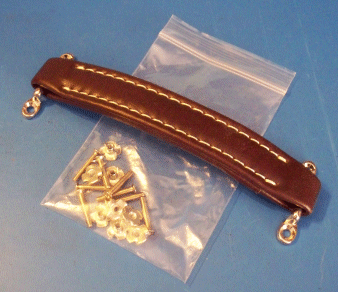 Your synth cabinet will thank you for giving it some shoes like these. I got these at one of those giant home
improvement stores.
Your synth cabinet will thank you for giving it some shoes like these. I got these at one of those giant home
improvement stores.
 So now you can avoid all of the rookie mistakes I made along the way and get it right the first time.
These cabinets work perfectly for me and I hope you benefit from these ideas if you decide to make a modular analog synth.
I'm out.
So now you can avoid all of the rookie mistakes I made along the way and get it right the first time.
These cabinets work perfectly for me and I hope you benefit from these ideas if you decide to make a modular analog synth.
I'm out.